> ## Documentation Index
> Fetch the complete documentation index at: https://support.floweq.com/llms.txt
> Use this file to discover all available pages before exploring further.
# Track Shipments with Workboard and EasyPost
> Learn how to leverage Workboard and EasyPost for shipment tracking.
In order to activate Workboard, you will need to have a FlowEQ custom plan that includes Workboard. Please reach out to us at [billing@floweq.com](mailto:billing@floweq.com) if you would like to add this to your plan.
With Workboard and EasyPost, you can now keep an eye on all of your packages and see when a return is en route to the warehouse, or when a replacement has been delivered. You can even use it to automatically follow up with customers when they forget to return merchandise.
This guide assumes:
* You will be tracking inbound packages
* Inbound packages use shipping labels created using the *Shipping Label: Return* steptype
* You have Workboard already set up
* Your team is using Flows with the *Create Workboard record* and *Update Workboard record* step types.
If you don't have these all in place already, [please get in touch](https://www.floweq.com/company/contact-info) and we'll be glad to help.
You can also track outbound packages. You'll need to add the outbound tracking numbers to Workboard yourself (either by CSV import, writing to a CRM field, or by creating a new record in Workboard manually), skip steps 1 and 2 below, and replace the *EasyPost Inbound Tracker* with the *EasyPost Outbound Tracker* steptype.
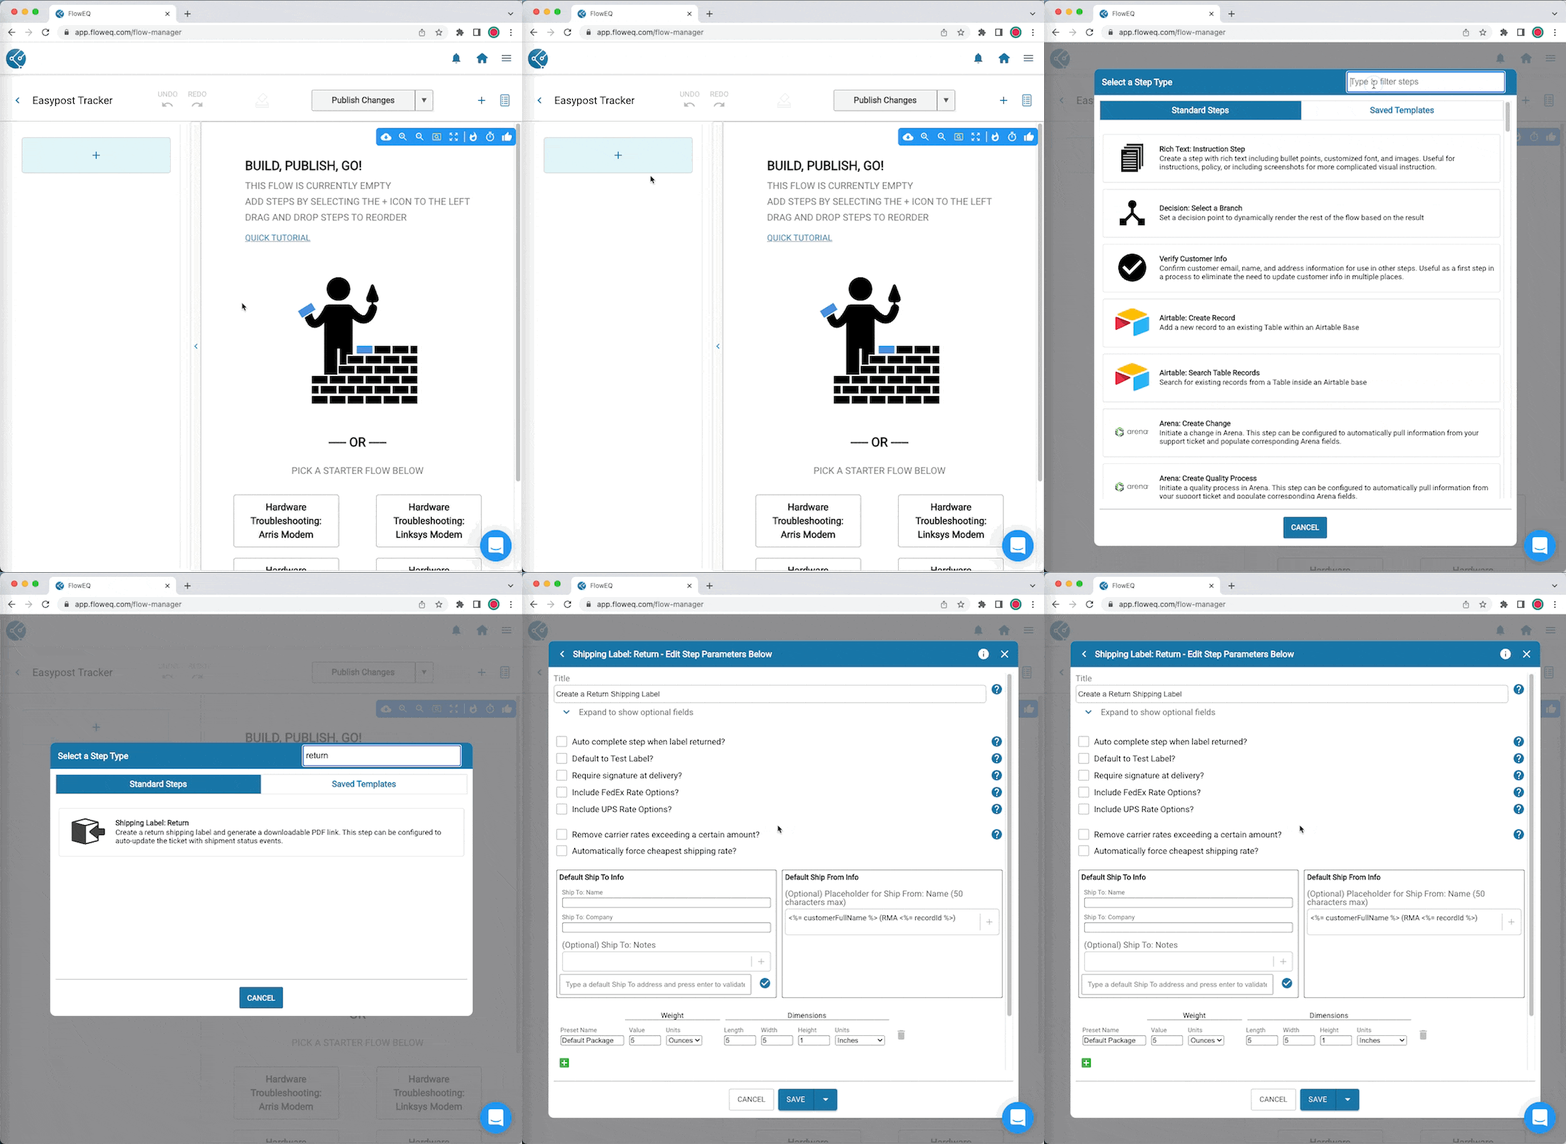
#### 1. Create the return shipping label
Use the *Shipping Label: Return* steptype to create a return shipping label. Be sure to complete the "Default Ship To Info" section.
 #### 2. (Optional) Write the tracking number to Workboard
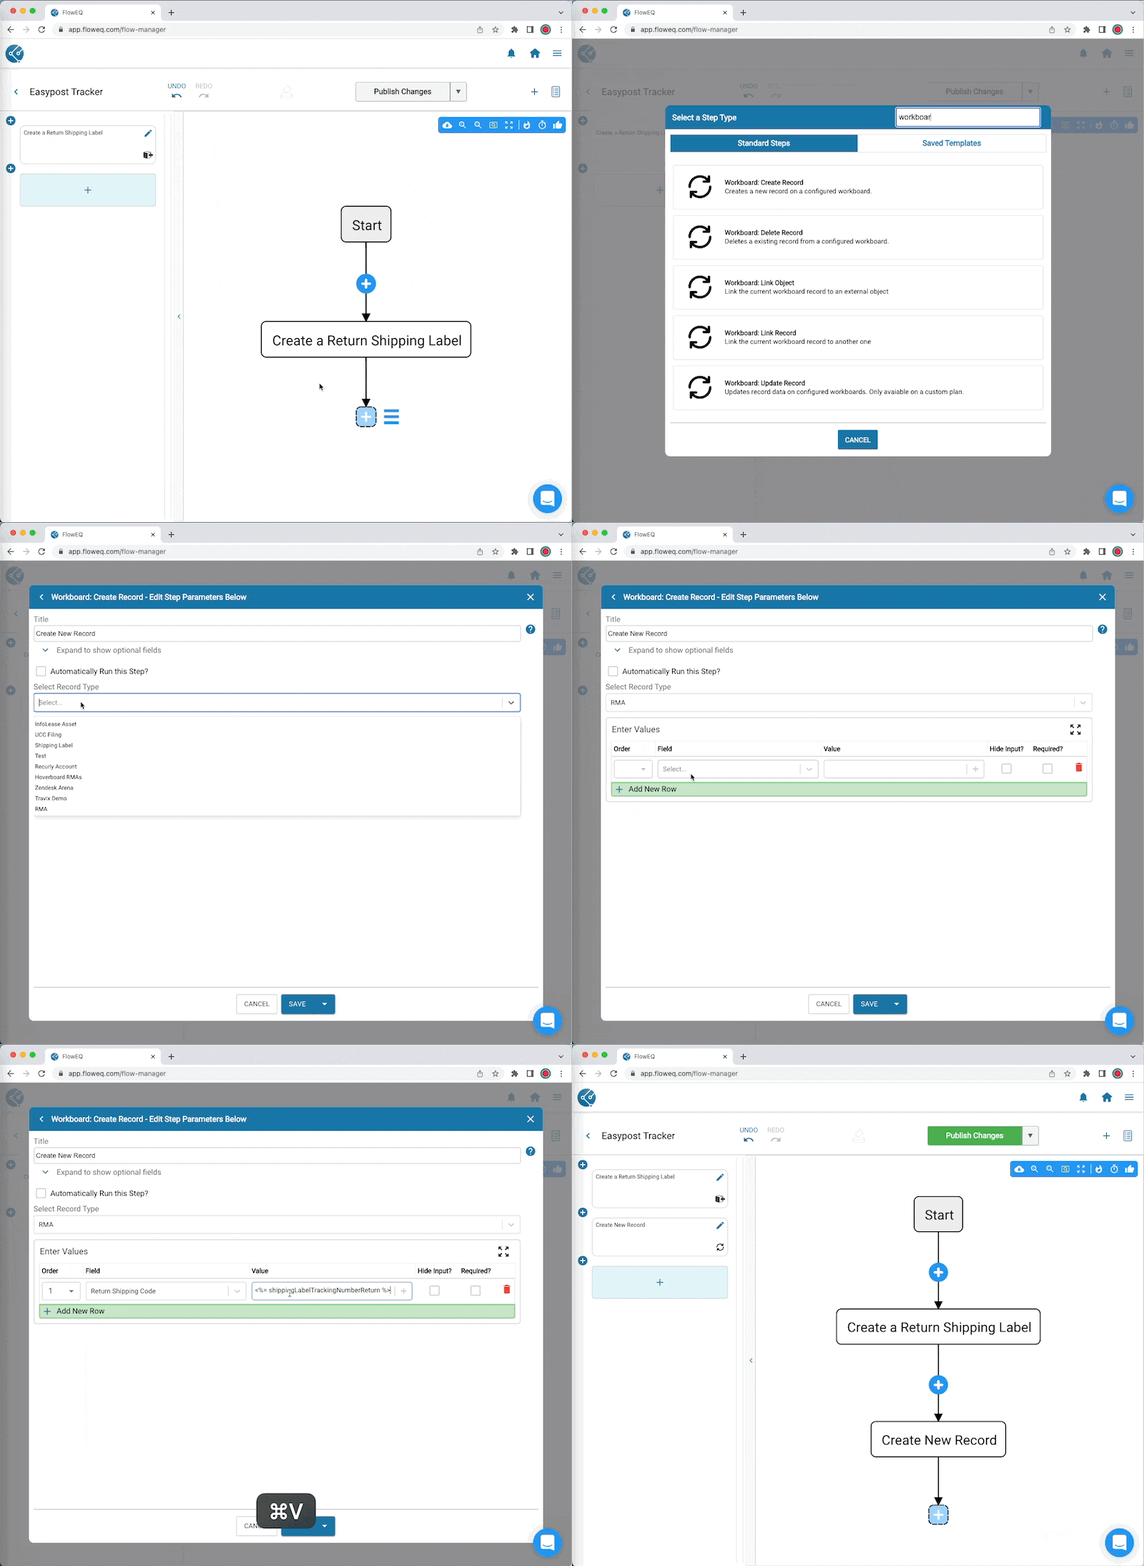
Use the *Workboard: Create Record* steptype to create a new record, and add the tracking number to it with this variable:
`<%= shippingLabelTrackingNumberReturn %>`
Note: You can also use the *Workboard: Update Record* steptype too. And if you have your CRM connected with Workboard, you can write the tracking number variable to any CRM field.
#### 2. (Optional) Write the tracking number to Workboard
Use the *Workboard: Create Record* steptype to create a new record, and add the tracking number to it with this variable:
`<%= shippingLabelTrackingNumberReturn %>`
Note: You can also use the *Workboard: Update Record* steptype too. And if you have your CRM connected with Workboard, you can write the tracking number variable to any CRM field.
 #### 3. Link the tracking number to the EasyPost Inbound Tracker
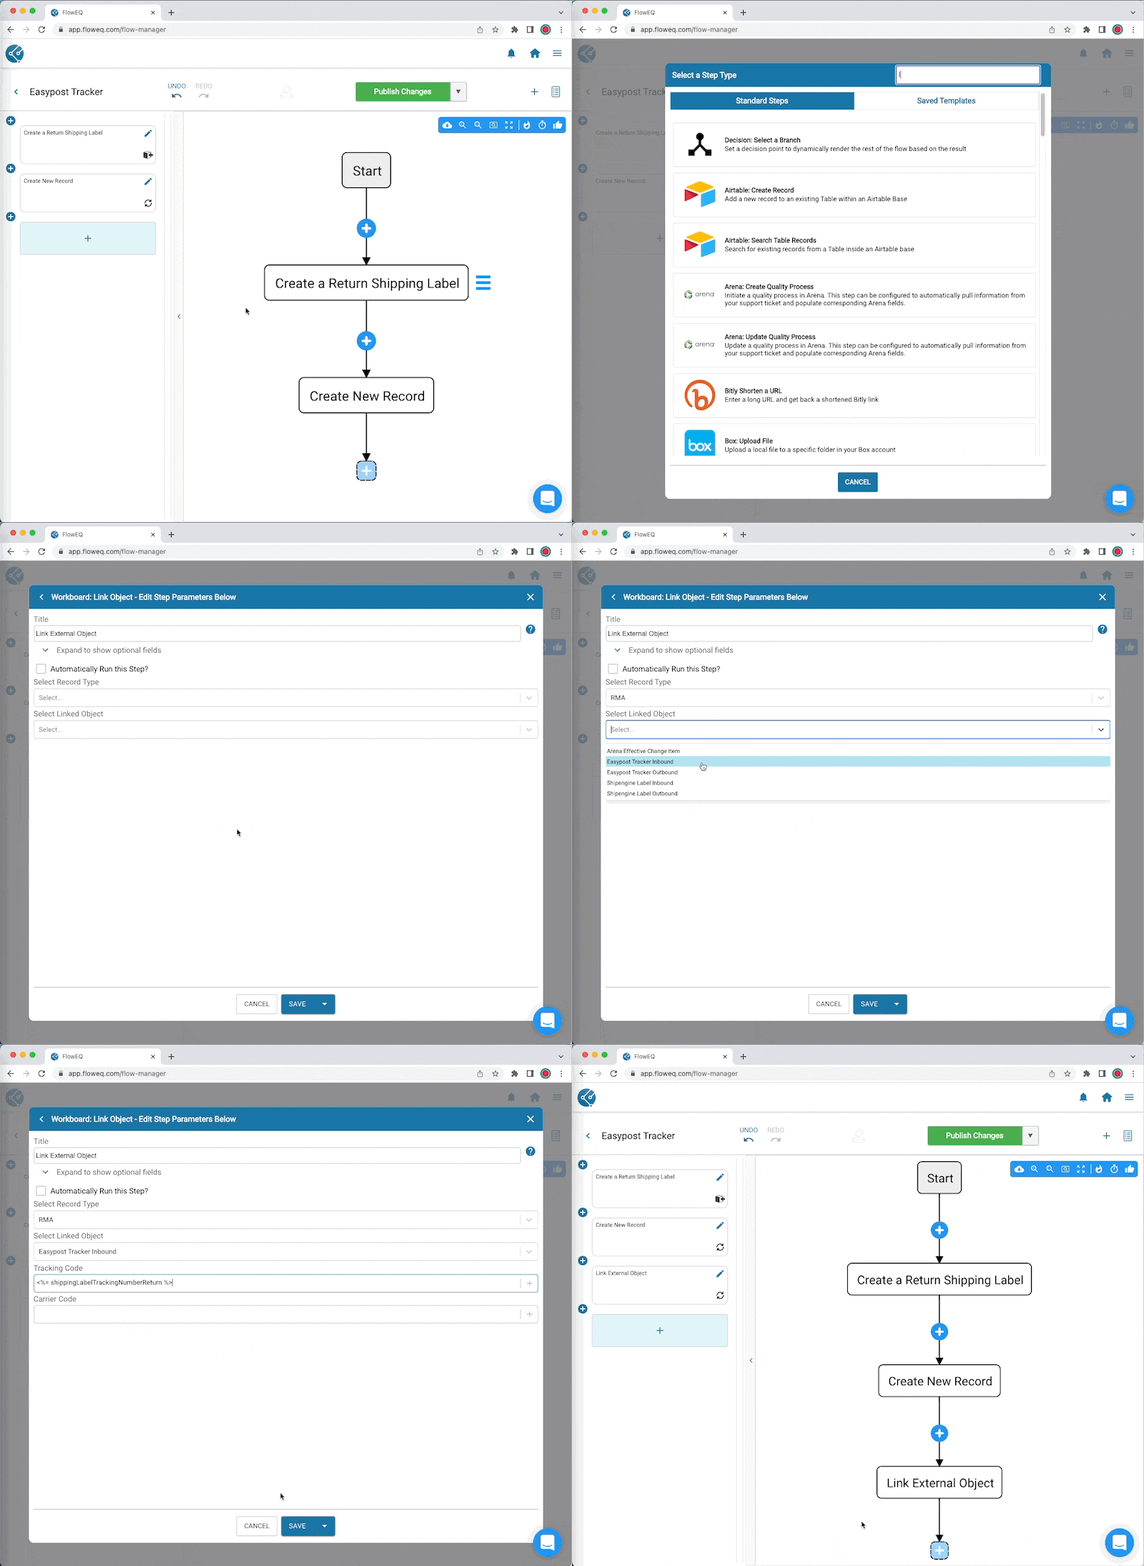
Add a *Workboard: Link Object* steptype, select the correct record type for your Workboard (in this case "RMA") then enter the variable below into the "Tracking Code" field. What this does is pass the tracking code for the shipping label you created in Step 1 to the *EasyPost Inbound Tracker*.
`<%= shippingLabelTrackingNumberReturn %>`
#### 3. Link the tracking number to the EasyPost Inbound Tracker
Add a *Workboard: Link Object* steptype, select the correct record type for your Workboard (in this case "RMA") then enter the variable below into the "Tracking Code" field. What this does is pass the tracking code for the shipping label you created in Step 1 to the *EasyPost Inbound Tracker*.
`<%= shippingLabelTrackingNumberReturn %>`
 #### 4. Publish the Flow
Click the "Publish Changes" button to make the Flow live. Your team can use this Flow to create return shipping labels effective immediately. When your team uses and completes this Flow, it will create a Workboard and link the EasyPost tracker to it automatically.
When you click on any record created using the Flow, you will first see all the fields from the Custom Record type you created in Workboard. Scroll further down to see the linked *EasyPost Inbound Tracker* object and all of its related fields, including shipping status.
#### 5. (Optional) Add a EasyPost Shipping Status column to Workboard
If you want to make the shipping status visible for all records when browsing Workboard, follow these steps.
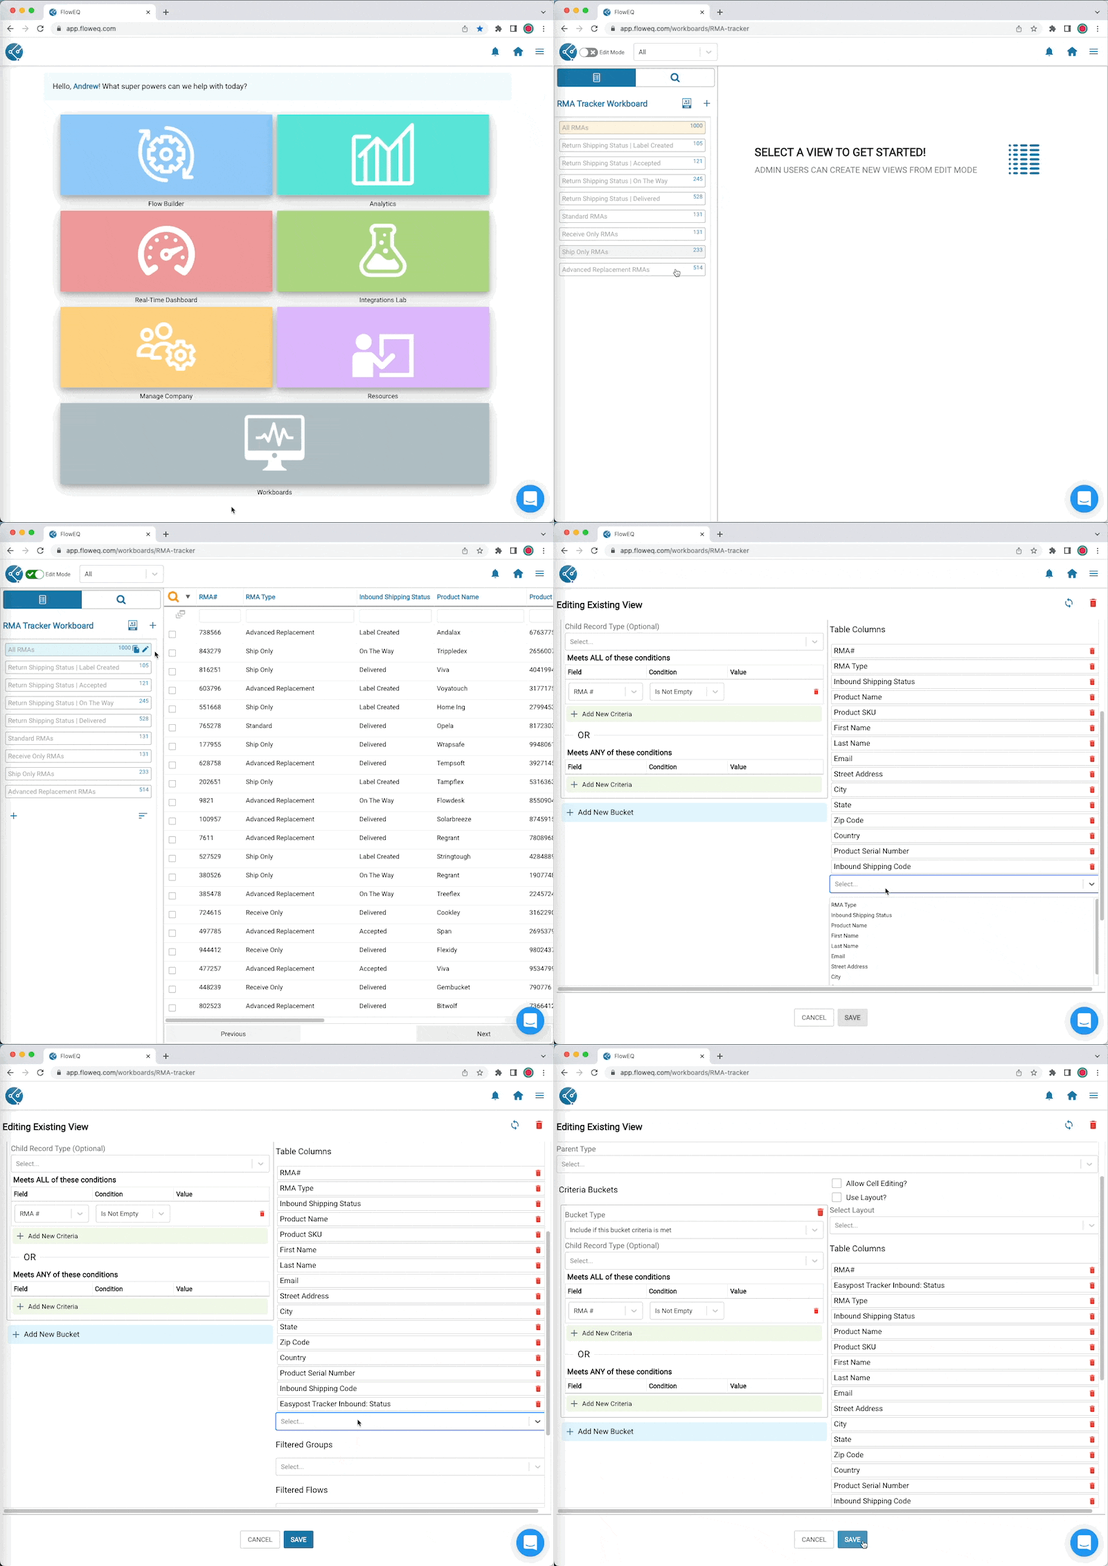
1. Open Workboard
2. Turn on "Edit Mode"
3. Click the bucket needs the new shipping status column.
4. Click the pencil that appears on the bucket label to edit it.
5. Under Table Columns, add the "EasyPost Inbound Tracker: Status" column
6. Click "Save"
This Workboard bucket will now show the current shipping status for each record linked to the *EasyPost inbound tracker*.
#### 4. Publish the Flow
Click the "Publish Changes" button to make the Flow live. Your team can use this Flow to create return shipping labels effective immediately. When your team uses and completes this Flow, it will create a Workboard and link the EasyPost tracker to it automatically.
When you click on any record created using the Flow, you will first see all the fields from the Custom Record type you created in Workboard. Scroll further down to see the linked *EasyPost Inbound Tracker* object and all of its related fields, including shipping status.
#### 5. (Optional) Add a EasyPost Shipping Status column to Workboard
If you want to make the shipping status visible for all records when browsing Workboard, follow these steps.
1. Open Workboard
2. Turn on "Edit Mode"
3. Click the bucket needs the new shipping status column.
4. Click the pencil that appears on the bucket label to edit it.
5. Under Table Columns, add the "EasyPost Inbound Tracker: Status" column
6. Click "Save"
This Workboard bucket will now show the current shipping status for each record linked to the *EasyPost inbound tracker*.