> ## Documentation Index
> Fetch the complete documentation index at: https://support.floweq.com/llms.txt
> Use this file to discover all available pages before exploring further.
# Airtable: Create Record
> Use FloweQ to create a record in Airtable
When your team has gathered information to put into Airtable, use the **Airtable Create Record** steptype to automatically pass details into the right table and database.
## Step Configuration
In addition to the general step configuration options, this step has the following specific options that can be configured.
### Base
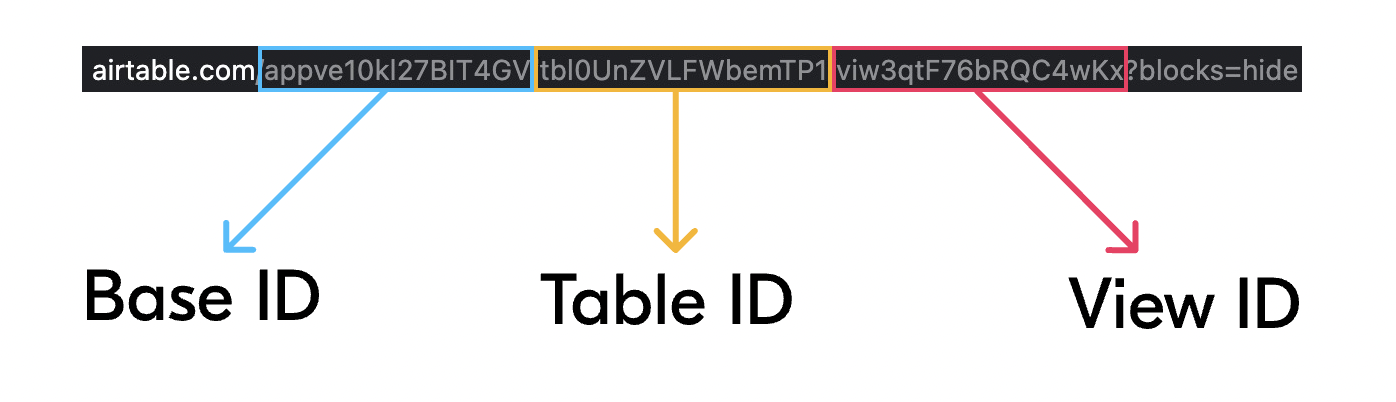
When viewing a particular table in Airtable, the URL is composed of three parts. You will need the **Base ID** part to use the **Airtable Create Record** steptype.
 ### Table Name
Enter the Table Name where you want a new record to be created. This table name will need to match the name of the table *exactly* how it appears when viewed inside of Airtable.
### Map Table Fields
#### Add Field
Click this button to add additional fields and their values for the newly created Airtable record.
#### Field Name
Use this field to specify a field you want to populate in the newly created Airtable record. The field name must exactly match how that field appears inside of Airtable.
#### Default Value
Use this field to enter a value to be written into the specified field. You can type whatever you want here as long as the field in Airtable can accept it. Use a variable from the button to pull in data from your CRM or other systems connected to FlowEQ.
### Table Name
Enter the Table Name where you want a new record to be created. This table name will need to match the name of the table *exactly* how it appears when viewed inside of Airtable.
### Map Table Fields
#### Add Field
Click this button to add additional fields and their values for the newly created Airtable record.
#### Field Name
Use this field to specify a field you want to populate in the newly created Airtable record. The field name must exactly match how that field appears inside of Airtable.
#### Default Value
Use this field to enter a value to be written into the specified field. You can type whatever you want here as long as the field in Airtable can accept it. Use a variable from the button to pull in data from your CRM or other systems connected to FlowEQ.